Creating Your Own Program & Experience Templates
Custom Programming
Introduction
💡You must have at least one custom Programming Template AND Experience Template!
💻 Curriculum > Program Templates
1. Programming Templates
OWNA provides two default formats for your Educational Program - Weekly Program and Single Block Program. You can use the Program Templates to edit these formats to create your own fully customisable Programs!
💻 Curriculum > Program Templates > Experience Templates (Tab)
2. Experience Templates
When you create a program, the Programming Matrix allows you to plan and document Learning Experiences. First, you will need to set these up via the Experience Templates section. Use our default question set to get started!
Create a new template
💡Only Admin users and the Educational Leader (position) can add and edit templates!
- From one of the above pages, click the ➕ icon in the top right corner of the screen
- Enter a title
- Select the Status (set to Draft by default)
- Select a starting template - This is important to make sure the system-required questions are added!
- Make any changes to the questions or add more fields
- Click Save

Template Options
- Enter a description to help understand the purpose of this program template and when it should be used
- Click 'Share with Group' if you want to make this template available to all centres in your organisation
- Click 'Share on OWNA Template Marketplace' if you want to share it with all OWNA centres in the template marketplace
Programming Template Required Fields
⚠️ All Program Templates must have the following fields!
💡These are the only fields/sections in the Program Template that are visible to families!
These fields are included in the starting templates:
- Title
- Topic/s we will be exploring
- Week/Date Commencing
- Room
- Educator(s) Responsible
- Program Matrix- with the column field populated e.g Mon- Fri
You can rename any of the above fields by changing the Label, but the Field Mapping needs to stay the same. Failure to include the above fields will result in an error when you try to save a new program using your template.
Essential Formatting!
The above fields and the Programming Matrix section (including the headings and horizontal lines above and below the matrix) are an integral part of the program structure. We do not recommend adding, removing or changing the order of any of the fields above the orange line in the example below, as this may cause the template to display incorrectly or fail to save.
- All fields under the green line can be fully customised.

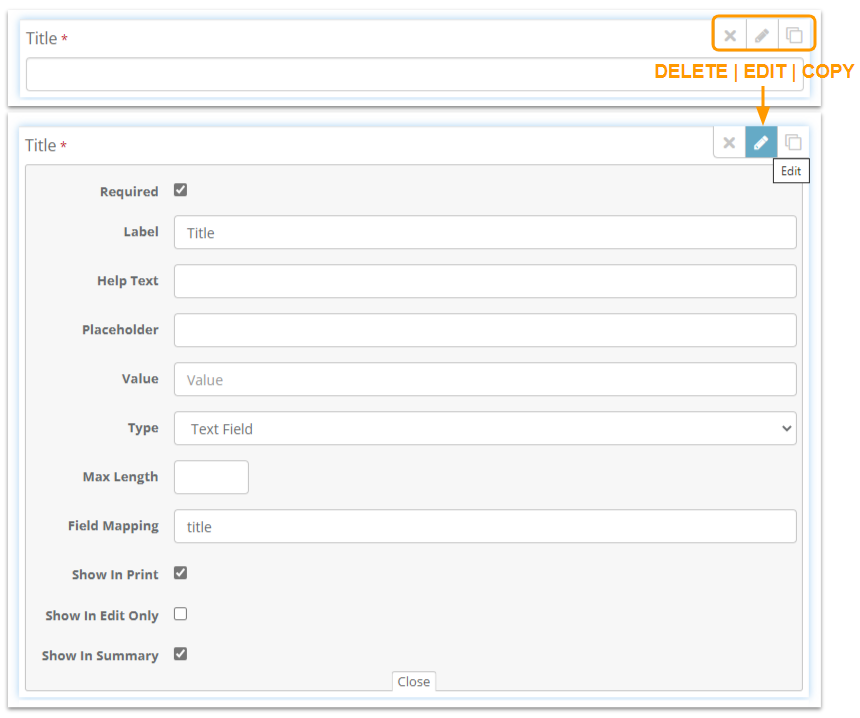
Customising template fields
Each field in your template has three buttons that appear when you hover over it:
- Delete
- Edit
- Copy
Click edit to select if the field is 'required' before completing, change the Label (text displayed on the field), type of input, field mapping, and visibility options. Some fields will have different options depending on the type of question (e.g. checkbox options or max length).
TIP: You can change the order of questions by clicking and dragging them up or down the page.
Program Template Visibility Options:
Show In Edit Only - field is not available when first writing the program-- Good for your reflection/evaluation questions that you do not need to see when first writing the program however DO want to see when editing your program down the track
Experience Template Visibility Options:
- Show In Print & Post
- Show In Diary Mode - field is included when 'viewing' a program (or editing with Diary Mode selected)
- Show In Summary - field is included when staff are viewing a program (rather than editing)
- Show To Parents - field is included in the parent view
Adding new fields
To add new fields/questions to your template, click and drag a field from the toolbox menu.

You can change the options available in your toolbox menu by clicking on the template editor settings (top right or underneath the toolbox) and toggling the options in the Toolbox Controls. Refer to the Available Fields table below to see what options are in each control group.

Available Fields
| Field Name | Description | Toggle Control |
|---|---|---|
| Single Block Program | Standard Program Template Questions (Programs Only) | Form Templates |
| Weekly Program | Standard Program Template Questions (Programs Only) | Form Templates |
| Children | Select Children | OWNA Controls |
| Rooms | Select Rooms | OWNA Controls |
| Staff | Select Staff | OWNA Controls |
| Link to Previous Post | Select from existing posts | OWNA Controls |
| Categories/Interest | Select from Program Categories/Interests | OWNA Controls |
| Children Goals | Select Children Goals (need to select child(ren) first) | OWNA Controls |
| Phoenix Cups | Framework Tags | OWNA Controls |
| 8 Aboriginal Ways of Learning | Framework Tags | OWNA Controls |
| UN Convention on the Rights of Child | Framework Tags | OWNA Controls |
| QKLG Kindergarten Outcomes | Framework Tags | OWNA Controls |
| Developmental Milestones | Framework Tags | OWNA Controls |
| Theorists | Framework Tags | OWNA Controls |
| NQS | Framework Tags | OWNA Controls |
| Principles & Practices | Framework Tags | OWNA Controls |
| My Time Our Place (MTOP) Outcomes | Framework Tags | OWNA Controls |
| EYLF Learning Outcomes | Framework Tags | OWNA Controls |
| Custom Tags | Custom (post) Tags | OWNA Controls |
| Heading | Groups questions below the heading (used to expand/hide section) | Default |
| Horizontal Line (Divider) | Enters a line across the page | Default |
| Text Field | Input for a single line of text | Standard Controls |
| Number | Provides controls to input or select a number | Standard Controls |
| Text Area | Input for a paragraph of text | Standard Controls |
| Background Image | Upload a background image for the Program (Programs Only) | OWNA Controls |
| Paragraph | Static text to be displayed in Program/Experience (not a question) | Standard Controls |
| Select | Select a single option from a dropdown menu | Standard Controls |
| Checkbox Group | Select multiple options from a list | Standard Controls |
| Radio Group | Select a single option from a list | Standard Controls |
| Date Field | Select a date from the calendar | Standard Controls |
| Time Field | Select a time from a 24-hour clock (or manual input) | Standard Controls |
| File Upload | Upload and attach files or images to the Program/Experience | Standard Controls |
| Signature Capture | Capture an electronic signature | Standard Controls |
| Star Rating | Make a selection from a customisable number of stars | Standard Controls |
| Programming Matrix | Adds a customisable grid where you can add Experiences under various Categories/Interests (Programs Only) | OWNA Controls |
| Learning Experience | Set of default learning experience questions (Experiences Only) | Form Templates |
Programming Matrix
💡 This field is required for all Programming Templates!
The Matrix is the control interface to be able to select categories/interests and apply Experience templates to your program.
Even though the table can be edited when setting up your program, you can still choose the default columns that will be configured when this template is used.
- Edit the Program Matrix Field
- Type your column headings into the 'Columns' section (separate each heading with a comma)
- E.g. Day 1, Day 2, Day 3, Day 4, Day 5

Programming Template Structure
The default/prebuilt programming templates are split into 3 sections that are important to maintain so the program appears correctly in the view mode.
⚠️ Each section must be separated by a heading with a divider line directly underneath!

Section 1 - Program Details
Defined as any fields above the Programming Matrix. Only some fields will display above the Programming Matrix. e.g. Title, Dates, Rooms, Educators, Goals, etc.
Section 2 - Programming Matrix
This section is where the Programming Matrix field should go. Other questions grouped with the Programming Matrix may not display in the view mode.
Section 3 - Program Content
This section is anything under the Programming Matrix. This is the best place to put all of your custom questions and text areas to display correctly in the view mode.
Updating and saving your template
⚠️ If you change fields on a template, this will update on all existing programs using the template!
It is important to be mindful when changing a program template. Unlike Learning Documents, any changes made to the template automatically update all existing programs using the template. Meaning that if you remove a field, any answers entered previously will no longer be visible.
If you accidentally remove a field, you can still revert to a previous version of the template to recover any information previously recorded.
- To save your template, click on the Save icon in the top right corner or at the bottom of the Toolbar menu.

At the bottom of each template, you will see a running record of template versions, when they were added, and which user. Here you can view each previous program with an option to restore it as the 'current' version.

Field Mapping and Error Handling
Field Mapping is a bit of code that links a field with an action or specific location within OWNA. It's how the system can tell the difference between a text box and a text box that should display your program name. When you use the pre-built question templates, these field maps are already entered, so it's important that you do not rename or delete these as it can break your template.

Change the Label, not the Field Mapping
- You can rename a question by changing the 'Label' value when editing a field. Please don't change the Field Mapping or it will prevent you from saving your program.
Duplicate Field Map found in control with Label Attachments 2 Please rename the Field Map property of this control so it is Unique.
Each Field Mapping value can only be used once in each template
- If you are copying a field with a value in the Field Mapping, you will need to remove the text from the duplicate field and leave it blank.

You must have exactly 1 Programming Matrix added to your template.
You must include a Programming Matrix in your program template